SWGEmu Infinity Mandalorian Quest Guide
Guide by: Euro & Jedhigh - Contributors - BoomBro, Doda, Zeaden
Visit The-One-Stop-Mando-Shop vendor on Corellia In the Swamptown cantina
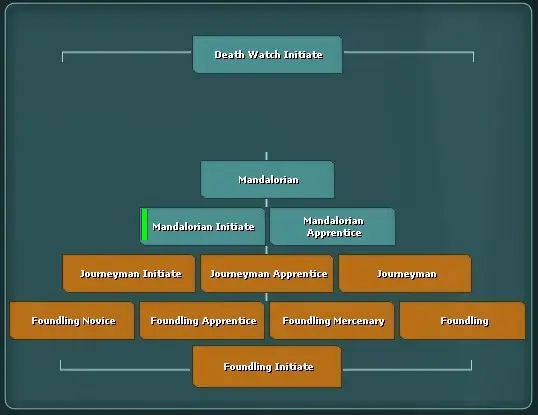
What is a Mando?
Mandalorian is a profession that has no skill point requirements. Once completed, it will allow you to take non-Jedi player bounty missions. To hunt Jedi, you must have Bounty Hunter investigation 3.
The first item you will receive is a Westar Pistol A schematic that you can choose either cold or acid damage. The schematic can be reclaimed from the armorer when the pistol is broken.
If you do the Triple Krayt quest with 250 available skill points, you will receive the mats and schematic for a usable backpack with 20% Poison & Disease absorption as well as +25% to Reputation. (Reputation increases the Mando XP rate and also shortens reputation missions) The backpack is also the key to the Mos Pelgo mines
You will also get a set of Mandalorian armor Appearance schematics. and a Jetpack (the Jetpack will be consumed upon completion of the exit quest)
Upon completion of the Exit quest, you will get an Amban sniper rifle trophy and a schematic. This schematic is one-time use as far as we know.
Part One - The Shit Show opening sequence
The quest starts in the very North of Tatooine in the city of Mos Pelgo, northwest of the player city Mos Deef.
Quest Giver Choz Vun (NPC in bounty hunter Armor)
/Waypoint 3008 7240 Choz Vun
A player can not be a Jedi.
You must have Master Brawler. Only no other skill points allocated. Novice Medic is Optional
Note: Force-sensitive skills and politicians do not use skill points, so these are okay to have.
Before you start the quest, be sure to have a really good weapon that you are certified to use, and a Stap speeder or better.
Also, you should know how to get to Greef before you start. He is in the downed ship turned cantina in Mos Eisley, in the back room that used to have Han and Chewy in it on live. If you do not know how to get to this room, find it before you start the quest.
Once you talk to Choz, he will give you 5 waypoints you must drive to (no Shuttles). At each point, kill all of Xonti Brothers’ thugs, loot them, then go to Greef and complete the Dialogue in less than 20 minutes. When you talk to Greef Blame Choz in the dialogue or you will fail.
You will only have about 3 minutes left after the final set of mobs, so hurry.
Master brawler is sufficient for what is next if you have a really good weapon, but it is recommended to pick up master marksman, master rifleman, and keep master brawler because these professions are a requirement in Part 4.
Part Two - Artifact
Meet Din Djarin on Rori at the bottom of the bunker
/Waypoint 4837 -1088 Din Djarin
Bring 100,000 credits (cash), and a Legendary Belsalvis Varactyl feather will be needed at the end of the quest. (the feather drops from random spawns of Legendary Varactyls on Rori or Creature Smuggling treasure maps) The feather is also sold by player vendors.
The screenshot on left is the guards location he will teleport you. Din Djarin's location is photo on the right.
Once you reach Din Djarin, use the dialogue to bribe the guards to stop attacking you.
Next you will be gathering the Artifact fragments from bunkers
Din will give you 12 waypoints, go to each bunker on the planets, and kill mobs until you get an artifact fragment in your inventory. No looting required to get fragments. Loot all containers, pick up any schematics you find. Once you have 4-6 fragments, go to Din Djarin and turn them in. Beware, several mobs spawn for every fragment you bring into the room with Din.
Pro tip: You can collect all of the fragments and hide them in an unequipped backpack to avoid the mob spawn.
If you die, you will have to start over.
Once you have turned in all 12 fragments, you will need to turn in the Varactyl feather.
Din Djarin will send you back to Greef in Mos Eisley.
You must have the artifact in your main inventory to speak to any Mandalorian quest NPC.
Part Three - First faction grind
Greef will tell you to go back to Mos Pelgo and join a faction. There are several factions of recruiters around the town. Choose one. (Do not choose Blacksuns, Black Krrrsantan, Xonti, or Zann. This is deathwatch only – Future Content.) Ask the NPC for work, and he will give you a quest to go to an area and kill a few NPCs. After you clear the area, another mission will spawn several times, then the missions will change planets you will get a system message. Your faction will increase once you have 5000 faction points with your chosen faction. You will have to do the same with their allied faction.
Warning: weak Jedi can spawn at these missions, but they are easy; an Intimidate and a knock down should be enough to survive.
Faction Information
Faction status
Loyalty +5000 Disregard -5000
Crimson Dawn – (Loyalty +Crymorah)(Disregard -Kanjiklub -Darkwalkers -Blacksun) – Recruiter location /waypoint 3093 7265
Crymorah Syndicate – (Loyalty +Crimson)(Disregard -Darkwalkers -Kanjiklub -Xonti) – Recruiter location /waypoint 3207 7437
Corellian Exchange – (Loyalty +Guavian)(Disregard -Kleef -Pyke -Xonti) – Recruiter location /waypoint 3106 7262
Darkwalkers – (Loyalty +Kanjiklub )(Disregard -Crymorah -Crimson -Black Krrsantan ) – Recruiter /waypoint 3025 7547
Black Krrsantan – (Deathwatch Only – Future Content) – Recruiter location /waypoint 2962 7409
Blacksun – (Deathwatch Only – Future Content) – Recruiter location /waypoint 3163 7221
Guavian Deathgang – (Loyalty +Corellian)(Disregard -Pyke -Kanjiklub -Xonti) – Recruiter location /waypoint 3025 7231
Kanjiklub – (Loyalty +Darkwalkers)(Disregard -Crymorah -Crimson -Zann) – Recruiter location /waypoint 3018 7290
Kleef – (Loyalty +Pyke)(Disregard -Corellian -Guavian -Krrsantan) – Recruiter location /waypoint 2949 7194
Pyke Syndicate – (Loyalty +Kleef)(Disregard -Guavian -Corellian -Blacksun) – Recruiter location /waypoint 3123 7318
Xonti Brothers – (Deathwatch Only – Future Content) Recruiter location /waypoint 3076 7432
Zann Consortium- (Deathwatch Only – Future Content) Recruiter location /waypoint 3067 7233
Once you have reached 5000 faction with your chosen faction, their allied faction, and also have -5000 with the enemy factions, return to the faction leader and ask to join.
Now return to Greef in Mos Eisley he will tell you to meet him in Mos Pelgo
/Waypoint 3030 7280 Greef workshop
Part Four - Jawa's Beast
After you speak to Greef, you must be Master Brawler, Master Marksman, and Master Rifleman only before attempting the jawa's quest. Greef says "you can have medic and scout if you are stupid" Don't be stupid.
Now you must talk to a Jawa Negotiator (near Mos Eisley)
The Jawa will ask you to kill a beast in a cave using a cold rifle. Pick up a decent SG82 rifle. Kill the beast in the cave. Do not move the beast out of his area; he will despawn. (30-minute respawn timer). You should get an egg, return it to the Jawa Negotiator, go through the dialogue, and then kill the Jawa. Return to Greef in his Mos Pelgo workshop
Part Five - Dr. Pershing
/Waypoint 3587 7040 Dr. Pershing’s lab
You must continue with Master Brawler, Master Marksman, Master Rifleman you can pick up Novice medic if you wish.
Greef will send you to Dathomir. From the Trade Outpost, you will have 4 waypoints you must go to in the order they are numbered. Write down the mobs’ faction, kill mobs (these mobs are a little harder than the previous mobs). Once you have reached Dr. Pershing, start dialogue, and at the point he asks who attacked you, type in Spatial one at a time in order, the factions only, not the mobs type. (case sensitive) Return to Greef in the Mos Pelgo workshop.
You are now free to change your skills again, picking up some medic will be helpful. Your next set of required skills will be master fencer, master pistoleer.
Part Six - Second Faction Grind
When you speak to Greef, he will assign you a new faction to join and a faction to be Loyal to. He wants you to level to Foundling before you return.
Warning: Mobs from Faction missions can use stun and lightsaber weapons, use a PSG and armor with lightsaber and stun resistance.
You will need to buy a com-PET and some Galaar droids
Assassin missions
If you have a Charred backpack equipped, this will make assassin & defender missions much easier and increase reputation gain.
Do assassin missions until you reach Foundling Apprentice, then trade a sterling Beskaar for training in the basement of the cantina.
Foundling tree trainer
In order to take missions, you will need to be part of a faction, so either do reputation grind or assassin missions to completion before doing the other.
Get +25 to Galaar droid signal comprehension, signal frequency, stability tapes, or AAs.
Get a Com-PET crafted or buy one, as well as some Galaar droids. You will need at least 50 droids, probably a lot more.
The com-PET becomes the Mandalorian datapad in your inventory. Use this datapad to pull assassin missions and find Informants.
Informants change every hour or two. Just select find informant if your informant is missing.
If you do not have a Charred backpack, the informant will give you 2 possible planets. If you have the backpack, he will give you the correct planet and a rough location to start looking.
Once you have found the correct planet, shuttle to the closest shuttle. and place a waypoint in the direction, and do your best at guessing the distance. You can hover over the Blue arrow on your mini map to see the distance move waypoint until you are very close to the correct distance. Send up another droid and head that way, moving your waypoint for each update.
Once you believe you have found the right area, send out another droid.
Your assassin target will constantly move and is not visible until you get near it. When you find it, an Orange waypoint will appear.
Start circling the area on a fast speeder growing 30m each trip around until you have reached 250m roughly.
Send another droid, repeat.
Do these missions until you have completely filled the skill box.
Galaar Status Missions reputation
For reputation this time around you can take Galaar Status Missions from the Mandalorian Datapad
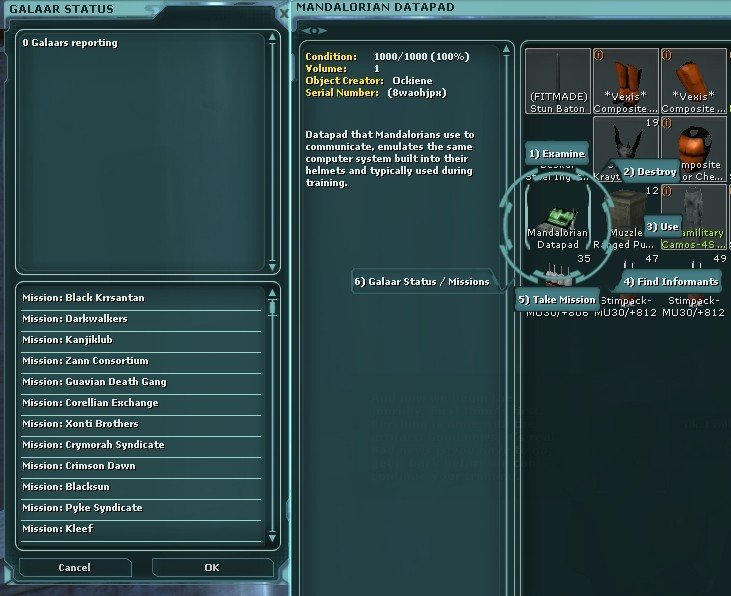
Choose the faction mission that will get you the correct faction points. Below is a list of faction received for each mission. You must be on the correct planet if you are not, it will tell you which planet to go to.
After some time, several orange waypoints will appear on your map. Go to them to kill the mobs. Do these missions until you have maxed all the required faction points.
Warning, these missions often have Jedi be prepared.
Galaar Status Mission Key
If you Kill __________: (+ Gain __________ Faction points) (-Lose __________ Faction ponts)
Black Krrsantan: (+Darkwalkers, Kleef) (-Kanjiklub, Pyke)
Blacksun: (+Crimson, Pyke, Zann) (-Guavian, Kanjiklub, Kleef)
Corellian: (+Kleef, Pyke, Xonti) (-Corellian, Krrsantan, Guavian)
Crimson: (+Blacksuns, Darkwalkers, Kanjiklub) (-Crimson, Crymorah, Zann)
Crymorah: (+Darkwalkers, Kanjiklub, Xonti) (-Crymorah, Krrsantan, Crimson)
Darkwalkers: (+Krrsantan, Crimson, Crymorah) (-Darkwalkers, Kanjiklub, Xonti)
Guavian: (Kleef, Pyke, Zann) (-Guavian, Blacksun, Corellian)
Kanjiklub: (+Crimson, Crymorah, Zann) (-Kanjiklub, Blacksun, Darkwalkers)
Kleef: (+Black Krrsantan, Corellian, Guavian) (-Xonti, Pyke, Kleef)
Pyke: (+Blaksun, Corellian, Guavian) (-Pyke, Kleef, Zann)
Xonti: (+Krrsantan, Corellian, Crymorah) (-Xonti, Crimson, Darkwalkers, Guavian, Kleef)
Zann: (+Blacksuns, Guavian, Kanjiklub) (-Zann, Corellian, Crimson, Darkwalkers, Pyke)
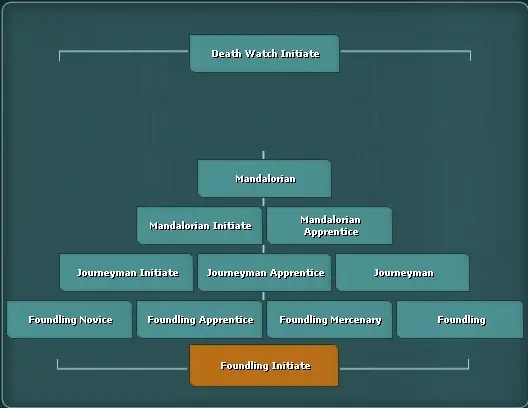
Foundling
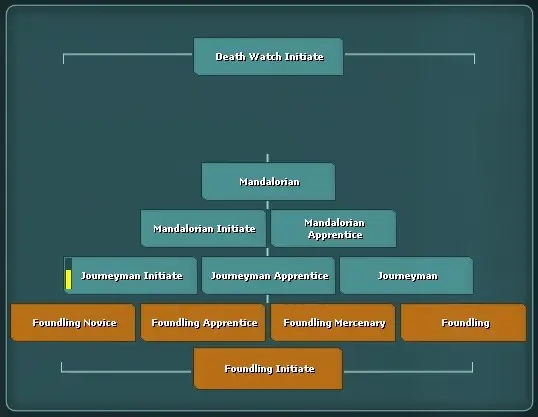
Once you have trained Foundling, return to Greef on the Medcenter roof.
Greef will ask you if you prefer cold or acid to kill your enemies this will determine the pistol schematic you receive.
Greef will send you back to Dr. Pershing on Dathomir to get the artifact back. Once you have it back, you could be attacked anytime you are outside of a safe zone. If you die, you will lose the artifact. I think you may have to gather the fragments again.
Part Seven - Damn Krayts
Single Krayt
You must have Master Fencer, Master Pistoleer
Do defender missions from the Mandalorian Datapad until you can train Journeyman Apprentice. The trainer is in the basement of the Mos Pelgo cantina. Return to Greef he will send you to Kuiil on Tatooine for the Krayt mission instructions.
Journeyman tree trainer
Kuiil
Kuiil will give you instructions on how to complete the single krayt quest.
Here is what you need to know.
You will need to have 1 Softcon (spice), 1 Minor Sand Demon (Bomb), and 100% recovery from burst run Parwan Nutricake (food) for every attempt.
You must be able to or have a ranger apply Tatooine camo (1xxx ranger)
The bomb should be placed 11m from the krayt in the direction you are going to run.
You must have enough space to get 42m away from the bomb in the direction you are running.
The bomb is only active for 12 seconds after placement.
You must be at least 42m away from the bomb when you activate.
The krayt must be charging you to take damage from the bomb. (shoot with a 65m range pistol to agro)
The spice only protects you from the blast for 4 seconds.
Talk to Greef to enter the wind farm.
Once inside, apply camo or stand near the fence by the droid, and have a ranger on the outside of the fence apply camo.
Pull mynocks with a 65m pistol, kill them with a Geo Blaster or Stun Baton. Do not go far from the corner you spawn in, just enough to pull or agro the mynocks. If you agro the krayt and are fast enough, the ranger can reapply camo, go prone, krayt may de-aggro, but not always.
BE SURE TO EQUIP 65m PISTOL BEFORE ATTEMPTING THE KRAYT
Go prone, double-check you have camo. Pick your running route away from Krayt. Set a waypoint at 54m from Krayt. (This is 43m away from the bomb, you are placing 11m from Krayt)
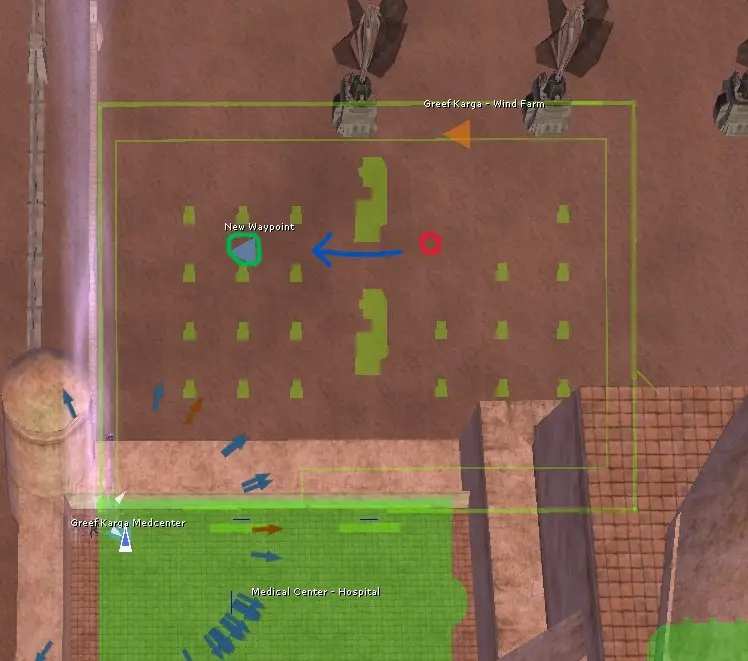
Be sure you have the waypoint down in the correct area. Double-check you have a 65m pistol equipped.
Place Stand, Softcon, Attack, and Parwan on your bar.
Position yourself 11m from krayt face in the direction you plan to run press Stand, and place bomb using the radial menu on the bomb in your inventory, eat Parawan run to the waypoint confirm you are at least 54m from krayt press Attack, Press Spice button, select detonate on the bomb using the radial menu, confirm krayt is running towards you and almost on top of the bomb, press detonate. Reminder, you have 12 seconds to detonate bomb after placing and 4 seconds to survive the blast after taking spice so everything I just mentioned must be done in that time frame.
If you wish to use the macro, see the video below.
Good Fucking luck!
Krayt quest failure trouble shooter.
If you die
You either failed to reach a safe distance from the bomb or you failed to detonate in the spice protection window of 4 seconds.
If the Krayt does not die
You either failed to shoot or missed the shot.
Or the krayt was not the correct distance from the bomb.
The Video below is done using a macro.
Here is the macro I used: (Parwan must be 100% recovery slot00 and Softcon slot01)
/yell TARGET KRAYT; /pause 0.3;
/ui action toolbarSlot00; /yell Run!;
/pause 4.8;
/kneel;
/ui action toolbarSlot01; /pause 0.3;
/stand;
/attack;
/pause 0.1;
/yell Detonate!!!;
Omera will ask for a 3.7m or greater Faa fish. (Greater than a 4m fish will yield a rare Mandalorian painting)
Most players would agree that buying a fish from another player is the best option; fishing for one yourself can take a long time. A 3.7-3.99 Faa can sell for around 10-15 million, 4m+ around 20 million. There is a chance to recoup some or all of your money if you get the right painting for the greater Faa turn-in.
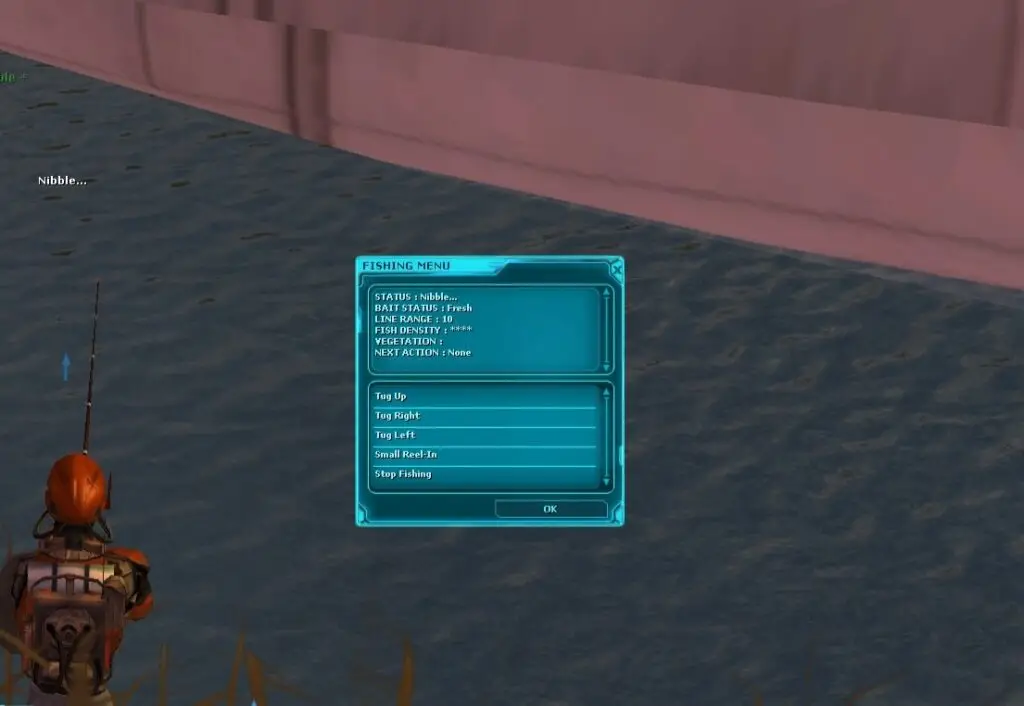
If you choose to fish yourself, master ranger seems to get larger fish on average, but this can be done with just Scout; you will need a 100% fishing pole and some bait. Choose a good fishing spot when you cast the window will show you 2 stats about the area: the fish density and the vegetation. A good spot will have 4-5 asterisks for fish density and 0-1 asterisk for vegetation.
How to fish: Every 5 seconds, the window has a status update (Waiting, Snagged, Nibble, and Bite). A small reel in seems to provoke a nibble during waiting, and provoke a bite during a nibble. Once you have a bite, select any tug option press okay. Tug up seems to work best for me.
Once you bring her the fish, she will send you back to Dr. Pershing, then he will send you back to Omera, and she will send you back to Dr. Pershing’s lab to see Greef on the Dock to the north. Greef will assign you the triple Krayt quest.
From this point on, follow Greef's instructions exactly. If you return to him without the correct training or at the wrong location, he will spawn mobs to attack you.
Part Nine - Triple Krayt
Drop all skill points before taking the triple Krayt quest. 250 point must be available to receive the Charred backpack.
This backpack is also the key to the doors in the Mos Pelgo Mine. (Armorer quest)
Total materials needed for a full attempt: 2x SoftCon, x2 Minor Sand Demons, 1x NonCon, 1x Greater Sand Demon, 3x Parwan Nutricake.
You will need to have 1 Softcon (spice), 1 Minor Sand Demon (Bomb), and 100% recovery from burst run Parwan Nutricake (food) for every attempt for each of the first 2 Krayts.
You will need to have 1 NonCon (spice), 1 Greater Sand Demon (Bomb), and 100% recovery from burst run Parwan Nutricake (food) for every attempt on the King Krayt.
Take the same steps on the 2 smaller krayts as you did on the single krayt. Just be sure you have chosen a good run path with enough room to get out of the blast.
The King Krayt is almost the same. The two differences are the spice/bomb used, and the blast radius is larger; you must be 54m away from the bomb. So 65m from Krayt, remind you that your pistol has a 65m range, so no room for error. LOOT THE KRAYTS
Good fucking luck!
Krayt quest failure trouble shooter.
If you die
You either failed to reach a safe distance from the bomb or you failed to use the spice properly.
If the Krayt does not die
You either failed to shoot or missed the shot.
Or the krayt was not the correct distance from the bomb.
The video below is a no macro video.
The video below is using a macro.
Once completed, you should have the backpack schematic and looted 3 charred krayt parts. Take these to a master tailor to craft.
You can now pick up any skill points that you wish (you will need a ranged area attack for the Two Birds quest)
(Feign death from smuggler is recommended for the armor quest line)
Greef will tell you to meet him back at Dr. Pershing’s lab, but not until you have trained Journeyman. From this point on, you can gain Mandalorian reputation from using the Westar-31b pistol (The Westar pistol will not yield pistol XP)
Part Ten - Journeyman to Mandalorian Initiate
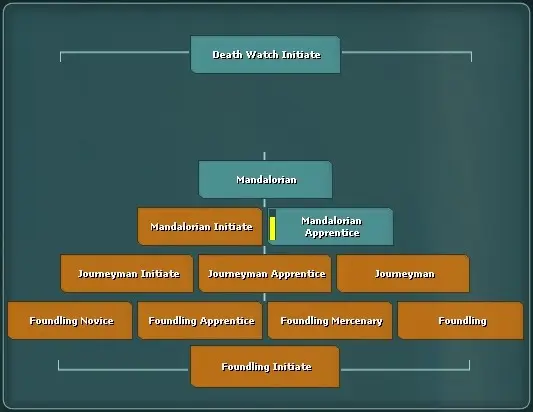
Once trained in Mandalorian Initiate meet Greef in the first spot you met him in Mos Eisley cantina.
Greef will now assign you the armor quest line.
Part Eleven - Mandalorian Armor Quest Line
Part Twelve - Two damn birds, one fucking stone!
After the Armorer quest, you will be sent to Dr. Pershing on Tatooine at the western Oasis
/way -5303 2653 Dr Pershing Oasis
This quest is very similar to the Krayt trials.
This quest is often the most troublesome of them all. It took me 15 attempts. You are almost done, grin and bear it!
The best advice I can give you here is to only do this quest on mostly flat terrain. If you are sent to a hilly area, reset the quest.
Dr. P will send you to Talus to meet his scout. The scout will give you the Kimas’ location, bring or be a Ranger with a Talus camo kit.
The Kima is like the single Krayt quest. Use SoftCon and Minor Sand Demon for the Kima portion of this quest.
The only two differences are the Kima patrols, make a /pet macro to get the Kima to sit, and continue using it to keep it in place.
Use camo, go prone, move to the Kima, and start to /pet the Kima.
Make sure you have a clear path.
I set the bomb at 7m from the Kima and run to 50m. Shoot, take SoftCon, Detonate Quickly
If you are succesful you will be teleported next to the Perleks, they are like the King Krayt portion of the triple Krayt trial. Target them, make sure you are between 8-11 meters, place a Greater Bomb, Parwan run to exactly 65m, shoot with a range area attack (i.e., Fan Shot), take NonCon, Detonate Quickly
If successful return to Dr Pershing at the Oasis. he will send you to Omera to start prepping for the exit quest.
Yavin 4
/way 5025 4426 Omera
When you talk to Omera go through the dialogue and once you ask about the back up troops she will give you a line to say to Din about his kitty screenshot this.
Part Thirteen - The Shit Show Closing Sequence
Exit Quest Hell Yeah!!!
Omera will send you to talk to Kruiil and Din Djarin
Omera will tell you what to say to Din Djarin, something describing his kitty screenshot this, and be sure to select the exact line she told you when you talk to Din.
When you talk to Din, he will tell you, “I said NO.” Choose the option “Fine, what about the shriek hawk missiles?” Then you should get a new dialogue option: “Omera said…”. Select the kitty phrase from the screenshot. Choose the exact phrase.
Kruiil will require the following to assist you
1x Magnetic Field Generator (Corvette from R5 droid)
3x Beskaar Crystals (Yavin 4 – Blue Leaf Temple POI) Loot containers
2x Donkuah Segments (Endor Donkuah POIs). We think the segments must be single stacks; sometimes, he just ignores large stacks, so just bring a bunch
2x Sharnoff Segments (Missions on Corellia). We think the segments must be single stacks; sometimes, he just ignores large stacks, so just bring a bunch
6x Small Balls (Geo Cave)
3x Geo rations (Geo Cave)
1x Tibbanna Gas -Must be greater than 1,000 (Naboo) Mauler POI kill mobs Loot containers
3x Foraged Livers (Scout/Ranger Foraging)
Kruiil should take the items from you if you have them, and he will also tell you what he still needs.
Items needed for Exit quest
Mandalorian helmet
Minimum of 90 Shriek Hawk missiles (100 recommended)
A Leviathan Bomb x1
UltraCon Spice x1
Recommended Skills
Taunt required
Burst run, dash, feign death, dizzy, posture down, Knockdown
UltraCon Macro
This is the UltraCon macro. Place UltraCon in the first toolbar slot
/pause 30;
/ui action toolbarSlot00;
Waypoint Macro
Click the link to copy waypoints, make a macro, paste the contents, run it once while on Yavin 4, and wait about 10 seconds for it to complete.
Phase One
You can see in the video the dialogue steps to start the quest. 1-“Go over the plan again.” 2-“I am ready to start.” 3-“Give me the short version.”
You will spawn on the dock. Activate your Jetpack and destroy the 4 mortars on the outskirts of the village. Avoid getting too close to pirates; they can and will destroy your jetpack (stay within 500m of the center of the village). You will need to be going full speed to activate the missiles. I do like a figure eight around the mortars.
Once all 4 mortars are destroyed, get off the jetpack and walk into the village, find the bomb hut.
Phase Two
Go to the bomb hut, grab all the bombs from the explosives container. Go put them in the boxes that have pirates near them. You will also get a message telling you what direction they are coming from. Go to the detonator hut, select “power on”, you should get the message “starts to hum”, select and press “detonate” quickly. You need to repeat this until you kill 100 pirates. You will get system messages updating you on your progress.
Phase Three
Go outside the village, be sure not to have any pirates on you if you do lose them or feign death. When it’s safe, get on your jetpack and look for AT-STs. Kill them just like the mortars (beware of pirates and try to agro the AT-STs before they go into the village, they spawn like a minute or two apart.
Phase Four
Get bombs from the bomb hut again, but this time fill every explosive storage crate, all 16, do not miss any.
If you lose count, you can count the messages in the chat window. Do not worry, you have plenty of time do not rush this part.
Once all are filled, drop the Levithan by the firepit and go find Hondo.
Taunt him and go to the detonation hut.
Place ultraCon on the toolbar
Power on – Detonate – Ultracon Macro- get to the firepit, be sure to keep Hondo aggroed, position him like in the video, dizzy him, and knockdown or posture as well as taunt if you start to lose him.
The quest often says failed even if you pass.
If you pass, you will spawn in one of the bunkers where you farmed the artifact fragments.
Be sure to talk to the bounty hunter in the bunker for your Rifle reward. Omera and Dr. P may have something for you, too.
If you failed, you will spawn in Omera’s village and will need to wait 3 hours before attempting again.
You have 3 attempts before you will be forced to do the two birds, one stone quest again.
Cap out XP and go train Death Watch Initiate In the basement of the Mos Pelgo cantina
One floor down in the basement
/waypoint 3039 7283 Shin Kraid